顯示具有 8051 Forever 標籤的文章。 顯示所有文章

2017年5月20日 星期六

8051 - Bluetooth Toy Car (English)

Warning and disclaimer:

If you don't have any basic electronics knowledge, please don't try this one. The author takes no responsibility for any damages caused as a result of this tutorial. Try this one at your own risk.

I am going to use a STC89C52RC microcontroller, a HC-06 UART interface Bluetooth module and a L298N motor driver module to biuld a Bluetooth remote control toy car. The toy car is controlled by Bluetooth Remote Toy, which is an android based application developed by me and can be downloaded form Google play store, so you can remotely control toy car via Bluetooth by your android phone. The toy car commands are as follows.

Every command consists one byte. If you stop a certain action, an OR operation will be performed between that action command and the Stop/Off command. For example,

  • 0x01000100(Forward) | 0x00100000(Stop) = 0x01100100, which will be sent to the toy car and make it stop forward.
  • 0x01001000(Front light) | 0x00100000(Off) = 0x01101000, which will be sent to the toy car and make it turn off the front light.

The red, green and blue buttons are reserved for those who want to do extra actions.

Control Function 1-byte Command
Red button 0x01000001
Green button 0x01000010
Blue button 0x01000011
Forward 0x01000100
Backward 0x01000101
Right 0x01000110
Left 0x01000111
Front light 0x01001000
Rear light 0x01001001
Stop/Off 0x00100000

2017年5月19日 星期五

8051 - Bluetooth Remote Shutter (English)

Warning and disclaimer:

If you don't have any basic electronics knowledge, please don't try this one. The author takes no responsibility for any damages caused as a result of this tutorial. Try this one at your own risk.

I am going to use a STC89C52RC microcontroller with a HC-06 UART interface Bluetooth module to create a Bluetooth remote shutter. The remote shutter is intended for use with Bluetooth Remote Toy, which is an android based application developed by me and can be downloaded form Google play store.

When the app is connected to the remote shutter, it will send the identification command 'W' to the remote shutter. When the remote shutter receives this command, it must return its ID 'I' to the app. Otherwise the app will think that the remote device is the camera shutter, which is a part of the app, not your own DIY remote shutter. The camera initialization is not the same for the remote shutter and the camera shutter.

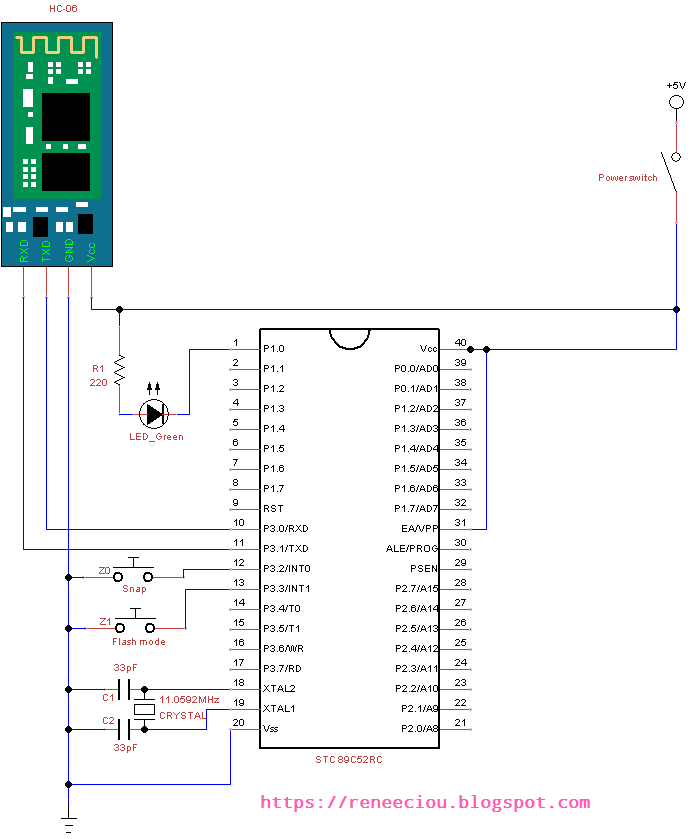
The circuit diagram is as follows. When the Z0 Snap button is pressed, a byte 'T' character is sent to the app, and the green LED will start flashing. When the app received 'T' character, it will start taking a picture. After finished taking a picture, the app will return a byte 'D' character to the remote shutter. If the remote shutter receives a 'D' character, the LED will stop blinking. If the remote shutter does not receive the 'D' character, the 10 seconds timeout will stop flashing.

When the Z1 Flash mode button is pressed, a byte 'M' character is sent to the app. The app will change the flash mode to next when it receives the 'M' character. You can also consider using other MCUs, like Arduino and so on.

Circuit Diagram

In circuit diagram there are two buttons, one for snap and another for flash mode. A LED is used to indicate taking a picture. A HC-06 Bluetooth module is used to receive/transmit command from/to android phone. A STC89C52RC microcontrolleri used to control the whole system.

2017年4月30日 星期日

8051 - MCU 8051 IDE Development Environment (English)

We will start to install MCU 8051 IDE on Ubuntu 14.04. You can use VirtualBox to install and run Ubuntu 14.04 so that you can use Windows and Ubuntu at the same time.

Download MCU 8051 IDE

Official website: http://www.moravia-microsystems.com/mcu-8051-ide/

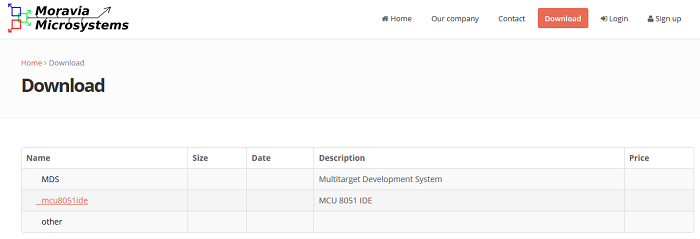
Click [Download] -> [mcu8051ide] -> [mcu8051ide] -> [1.4.10] -> [mcu8051ide-1.4.10-all.deb]