顯示具有 養了一隻小企鵝 標籤的文章。 顯示所有文章

2014年10月18日 星期六

Banana Pi - 小企鵝的香蕉派食譜

編譯u-boot, linux kernel與script.bin

安裝編譯所需的套件:
$ sudo apt-get install build-essential u-boot-tools binutils-arm-linux-gnueabihf \
gcc-arm-linux-gnueabihf cpp-arm-linux-gnueabihf g++-arm-linux-gnueabihf
安裝usblib套件,因為在編譯sunxi-tool需要這個libary:
$ sudo apt-get install libusb-1.0-0 libusb-1.0-0-dev
安裝其他工具:
$ sudo apt-get install git wget vim libncurses5-dev
下載source code:
$ git clone https://github.com/LeMaker/bananapro-bsp.git
編譯source code:
$ cd bananapro-bsp
$ ./configure BananaPi
$ make

2014年6月29日 星期日

Ubuntu Desktop下安裝VirtualBox Guest Additions提高畫面解析度

安裝所需的套件:
sudo apt-get update  
sudo apt-get upgrade  
sudo apt-get install dkms  
sudo apt-get install build-essential
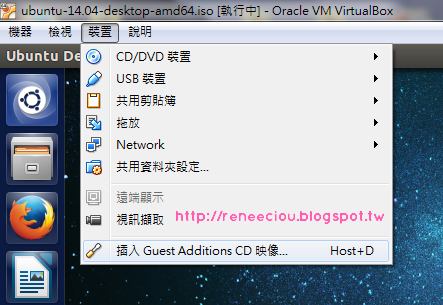
插入Guest Additions CD映像:


2014年5月11日 星期日

Ubuntu DHCP安裝與設定

安裝環境Ubuntu 10.04

安裝套件
$ sudo apt-get install dhcp3-server
設定DHCP Server的網卡介面,編輯/etc/default/dhcp3-server檔案:
$ sudo vim /etc/default/dhcp3-server
INTERFACES="eth1"
設定DHCP Server,編輯/etc/dhcp3/dhcpd.conf:
$ sudo vim /etc/dhcp3/dhcpd.conf
default-lease-time 600;
max-lease-time 7200;
option subnet-mask 255.255.255.0;
option broadcast-address 192.168.1.255;
option routers 192.168.1.1;
option domain-name-servers 8.8.8.8, 168.95.1.1;
option domain-name "reneeciou.example";

subnet 192.168.1.0 netmask 255.255.255.0 {
range 192.168.1.10 192.168.1.100;
range 192.168.1.150 192.168.1.200;
} 

2013年11月23日 星期六

Ubuntu Server下安裝VirtualBox Guest Additions並啟用共用資料夾

安裝build code所需的一些套件:
sudo apt-get install build-essential
掛載CD Rom:
$ sudo mount /dev/cdrom /mnt
在/mnt下可以看底下這些檔案:
$ ls /mnt
32Bit        cert                    VBoxSolarisAdditions.pkg
64Bit        OS2                     VBoxWindowsAdditions-amd64.exe
AUTORUN.INF  runasroot.sh            VBoxWindowsAdditions.exe
autorun.sh   VBoxLinuxAdditions.run  VBoxWindowsAdditions-x86.exe
安裝Guest Additions:
$ sudo /mnt/VBoxLinuxAdditions.run

2013年11月11日 星期一

SSL Certificates

OpenSSl Self-Signed Certificate Generation
底下將透過Ubuntu下的openssl指令產生數位憑證(Certificates),在產生憑證前,你需要用下面的指令產生一把private key,並要求你輸入密碼保護這把key。
$ openssl genrsa -des3 -out server.key 2048
但為了方便起見,最好不要為key設密碼,不然你每次啟動secure services都要輸入密碼,例如你架了一個SSL連線加密保護的Web Server (HTTPS),每次你啟動它的時候都要輸入密碼,萬一你的server主機出問題自動重開機,使用者就無法連到你的Web Server,除非你為key輸入密碼。底下的指令是透上面產生的key再產生一把沒有設密碼的key,至於你要用哪一把就看你囉!如果是我,我會選擇沒設密碼的private key。
$ openssl rsa -in server.key -out server.key.insecure
$ mv server.key server.key.secure
$ mv server.key.insecure server.key
接下來,要產生一張Certificate Signing Request (CSR),指令如下。
$ openssl req -new -key server.key -out server.csr
You are about to be asked to enter information that will be incorporated
into your certificate request.
What you are about to enter is what is called a Distinguished Name or a DN.
There are quite a few fields but you can leave some blank
For some fields there will be a default value,
If you enter '.', the field will be left blank.
-----
Country Name (2 letter code) [AU]:TW
State or Province Name (full name) [Some-State]:Taiwan
Locality Name (eg, city) []:Kaohsiung City
Organization Name (eg, company) [Internet Widgits Pty Ltd]:Renee's Blog
Organizational Unit Name (eg, section) []:Owner
Common Name (e.g. server FQDN or YOUR name) []:reneeciou.blogspot.tw
Email Address []:reneeciou@example.com.tw

Please enter the following 'extra' attributes
to be sent with your certificate request
A challenge password []:
An optional company name []:
2013年10月15日 星期二

Cross compile bluez for ARM

下載與解壓縮toolschain:
http://www.friendlyarm.net/dl.php?file=arm-linux-gcc-4.4.3.tgz
$ sudo tar xvf ~/arm-linux-gcc-4.4.3.tgz -C /
設定環境變數:
$ export PATH=/opt/FriendlyARM/toolschain/4.4.3/bin:$PATH
$ export CROSS_COMPILE=arm-none-linux-gnueabi-
$ export ARCH=arm
編譯BlueZ 2.25:
下載與編譯bluez-libs:
$ mkdir bluez-2.25
$ cd bluez-2.25
$ wget http://bluez.sf.net/download/bluez-libs-2.25.tar.gz
$ tar zxvf bluez-libs-2.25.tar.gz
$ cd bluez-libs-2.25
$ ./configure --host=arm-none-linux-gnueabi --prefix=/home/renee/myfs/rootfs \
--enable-shared=no --enable-static=yes
$ make
$ make install

2013年9月10日 星期二

Linux中斷處理

由於IO設備的速度遠慢於CPU,如果CPU要等待IO動作完成並處理的話,效率是非常差的。透過interrupt機制可解決這問題,當IO動作完成後會發出一個asynchronous interrupt,CPU偵測後會暫停手邊的工作,然後喚醒ISR(interrupt service routine)執行,並處理I/O的請求。
  • interrupt的精神:
    1. interrupt handlers不能進入sleep,所以要避免呼叫叫到一些functions,內部潛在包含了進入sleep的function calls。
    2. 當interrupt handlers部分code要進入critical section,請用spinlocks上鎖,而不是mutexs。
    3. interrupt handlers不能與user space進行資料交換。
    4. interrupt handlers必須要儘速執行完畢。為了確保這一點,最好將執行工作切成兩部分,分別是top half與bottom half。handler的top half部分會儘速完成工作,然後可以晚點執行的工作放在bottom half,可以透softirqs與tasklets達到此目的。
    5. interrupt handlers不能重複被呼叫。當一個handler已經在執行,它的對應IRQ必須要被disable,直到handler執行完畢。
    6. interrupt handlers能被更高權限的handlers中斷。如果要避免被高權限的handlers中斷,你可以將interrupt handler標示為fast handler。但如果太多被標示為fast handlers被導致系統performance下降,因為interrupt latency時間會變長。
  • synchronous interrupt(軟體產生):
    1. 當runtime錯誤發生,會發出此interrupt。
    2. software interrupts,例如system calls。

2013年9月7日 星期六

Mini2440我命令你復活吧!

mini2440官方網站:http://www.friendlyarm.net

底下所有步驟完成後,目錄結構如下:
|---home---renee
             |
             |----mini2440------u-boot------(source code)
             |              |           |
             |              |           ----u-boot.bin
             |              |
             |              ----kernel------(source code)
             |                          |
             |                          ----arch----arm----boot----zImage
             |
             |----myfs------rootfs------lib----modules
             |                      |
             |                      ----bin----(busybox tools)
             |                      |
             |                      ----sbin----(busybox tools)
             |                      |
             |                      ----usr------bin----(busybox tools)
             |                               |
             |                               ----sbin----(busybox tools)
             |
             |----tftpboot----uImage

2013年8月31日 星期六

Linux Linked Lists

Linux本身已經實作了doubly linked lists的資料結構,我們可透過linked lists實現一些功能,底下是一個範例:

定義list節點的資料結構
struct _job_list {
 struct list_head all_jobs; /* 工作清單 */
 void (*worker_handle)(char *); /* 執行工作的function */
 void *worker_data; /* 執行工作所需資料 */
 wait_queue_head_t todo; /* 用於同步boss與worker */
 spinlock_t lock; /* 用於保護工作清單的鎖 */
};

2013年8月24日 星期六

Linux Kernel Threads

很多的drivers會透過Kernel threads(簡稱,kthread)的協助,讓kthread在背景執行扮演服務的角色,然後等待events發生。在等待的過程中,kthread會進入sleep狀態,當事件發生的時候,kthread會被喚醒執行一些time-consuming的工作,如此一來,可防止main thread被blocking住。可透過下面的指令來查看系統上有哪些kthreads:
$ ps -ef
透過上面的指令,可以看到下圖PPID為2的都屬於kthread: 底下是一個kthread的範例,透過insmod載入模組後,會啟動mykthread,然後等待events發生:

2013年8月11日 星期日

Linux Kernel Timers

Kernel依據硬體所提供的不同timer來提供時間相關的服務,例如busy-waiting與sleep-waiting。如果process使用busy-waiting延時等待會浪費掉CPU的時間,反之sleep-waiting可以讓process在等待的這段時間進入睡眠,並交出CPU讓其他的process使用,等時間到了,這process會被叫醒繼續執行。首先,先瞭解一些重要的Kernel Timers變數含義,如jiffies, HZ與xtime。

HZ:
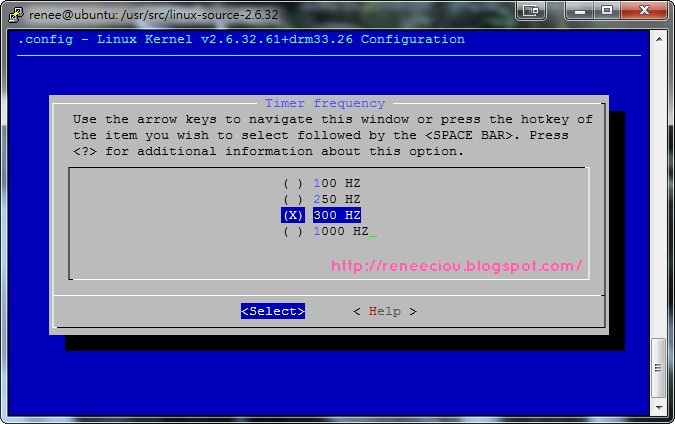
每隔固定週期Linux Kernel會發出timer interrupt,HZ定義每一秒有幾次timer interrupts,而HZ變數是儲存在Kernel變數中,在編譯Kernel之前,可以透過make menuconfig設定此值,設定路徑Processor type and features → Timer frequency (250 HZ):

2013年7月30日 星期二

Linux BogoMIPS

在Linux開機的過程中,通常可以看到這個訊息:Calibrating Delay... xxxx BogoMIPS (lpj=xxxxxxx),表示Kernel在開機過程會計算CPU在一個jiffy時間內能執行多少次的延時迴圈,這個計算過程是依據CPU的處理速度進行校正,校正結果值會儲存在Kernel變數中,此變數稱為loops_per_jiffy,而loops_per_jiffy值經過處理後可得到BogoMIPS值。Bogo是Bogus(偽)意思,而MIPS(Million Instructions Per Secon)是每秒百萬指令,所以BogoMIPS就是假的MIPS。透過此網頁http://www.clifton.nl/bogo-list.html可知道不同處理器所對應的BogoMIPS。

那為什麼需要loops_per_jiffy這個值?因為Kernel Driver有時需要很短且精準的delay (millisecond, microsecond, and nanosecond delays),此時透過jiffies實現delay是不適用,由於單位不夠小,假設Timer Frequency是250HZ,則一個tick相當於4ms,表示最小delay時間只能到4ms。所以Kernel提供 mdelay(), udelay(), 和 ndelay() 這三個函式來達到極短且精準的delay,而這三個函式是透過loops_per_jiffy實現,去計算需要多少個loop operation來得到精確的delay。

2013年7月13日 星期六

Ubuntu核心編譯

重新編譯Kernel

安裝編譯所需的工具:
$ sudo apt-get install libncurses5-dev kernel-package
下載Kernel Source Code:
$ sudo apt-get install linux-source
解壓縮:
$ sudo tar jxvf linux-source-2.6.32.tar.bz2
複製.config檔:
$ cd linux-source-2.6.32
$ sudo cp -vi /boot/config-`uname -r` .config
基於Ubuntu為Kernel配置的檔案,依需求進行修改:
$ sudo make menuconfig

Linux下新增與移除驅動程式/模組

模組相關指令:
depmod - generate modules.dep and map files
insmod - insert a module into the Linux Kernel
lsmod - show the status of modules in the Linux Kernel
modinfo - show information about a Linux Kernel module
modprobe - add and remove modules from the Linux Kernel
rmmod - remove a module from the Linux Kernel
通常Linux Kernel模組是存放在/lib/modules/$(uname -r) 目錄下,可以透下面指令查看:
$ ls /lib/modules/$(uname -r)
# 注意: 此目錄下會有一個modules.dep檔案,用於記載模組相依性訊息。
透下面指令列出所有裝置的驅動程式模組:
$ ls /lib/modules/$(uname -r)/kernel/drivers/

2013年1月11日 星期五

Linux各種解壓縮

.tar
Uncompress:
$ tar xvf directory.tar
Compress:
$ tar cvf directory.tar directory
.bz2
Uncompress:
$ bzip2 -d directory.bz2
Compress: 只能壓縮指定檔案,不能壓縮目錄
$ bzip2 -zk file1 file2 file3
.tar.bz2
Uncompress:
$ tar jxvf directory.tar.bz2
Compress:
$ tar jcvf directory.tar.bz2 directory

2013年1月8日 星期二

Linux下編譯RD9700 Driver

下載RD9700 driver
$ wget http://www.elite.uk.com/mike/qf9700/qf9700-2.6.32.tar.gz
更新最新的套件資訊
$ sudo apt-get update
下載適當的header
$ sudo apt-get install linux-headers-`uname -r`
安裝基本編譯器
$ sudo apt-get install apt-get build-essential
解壓縮RD9700 driver
$ tar zxvf qf9700-2.6.32.tar.gz
$ cd qf9700

2012年5月1日 星期二

如何安裝Ubuntu NFS Server

安裝NFS Server
$ sudo apt-get install nfs-kernel-server
配置NFS Server
$ sudo vim /etc/exports
新增下面內容:
/home/renee/myfs *(rw,sync,no_root_squash)
重新啟動NFS Server
$ sudo /etc/init.d/portmap restart
$ sudo /etc/init.d/nfs-kernel-server restart
測試
$ sudo mount -t nfs localhost:/home/renee/myfs /mnt

如何安裝Ubuntu DHCP Server

安裝環境Ubuntu 12.04, 14.04 或 16.04
安裝套件
$ sudo apt-get install isc-dhcp-server -y
配置DHCP Server
$ sudo vim /etc/dhcp/dhcpd.conf
新增下面內容:
default-lease-time 600;
max-lease-time 7200;
option domain-name "mydomain.example";
subnet 192.168.1.0 netmask 255.255.255.0 {
  range 192.168.1.10 192.168.1.100;
  range 192.168.1.150 192.168.1.200;
  option subnet-mask 255.255.255.0;
  option broadcast-address 192.168.1.255;
  option routers 192.168.1.1;
  option domain-name-servers 192.168.1.1, 192.168.1.2;
}

2012年4月30日 星期一

如何安裝Ubuntu subversion + apache + ssl + 權限控制

安裝apache
$ sudo apt-get install apache2
安裝完成後,在瀏覽器輸入http://localhost,如果看到It works!,表示apache安裝成功。或是透過curl指令來測試apache是否安裝成功,如下:
$ sudo apt-get install curl
$ curl http://localhost
<html><body><h1>It works!</h1></body></html>
安裝subversion
$ sudo apt-get install subversion
svn與apache搭配使用要安裝libapache2-svn套件
$ sudo apt-get install libapache2-svn
Enable SSL
$ sudo a2enmod ssl
$ sudo vim /etc/apache2/ports.conf
檢查下面內容是否存在ports.conf,如果沒有,新增下面內容:
<IfModule mod_ssl.c>
    Listen 443
</IfModule>